DNS TTL, or time to live, is the element of a DNS record that tells the requester how long the record is valid. If the TTL for our DNS record is set to 24 hours, a browser has will continue to use that same value for the next 24 hours regardless of whether the DNS record is updated or not.
- Why is DNS TTL important?
- Higher or Lower DNS TTL?
- Can we Set Shorter TTLs?
- Common TTL Values
- DNS TTL best practices
- Example of DNS TTL
- When to Use a Long TTL
Table of Contents
Why is DNS TTL important?
DNS TTLs are vital to websites that make constant changes and updates frequently. By having a lower TTL, we can ensure that we are receiving the most recent updates in a given timeframe.
For example, our DNS resolver will pull a DNS record from its authoritative server every hour. Then for that hour, every user that queries that DNS site will receive a cached version of the website until the resolver pulls another update copy from the authoritative server again.
This process of utilizing the resolver’s cache significantly improves our end-users’ overall experience.
Example of TTL in DNS
Here’s an example of a DNS TTL (Time to Live):
Record: A (Address) record

Domain: example.com

IP Address: 192.168.1.100

TTL: 3600 seconds (1 hour)
This means that when a DNS resolver or client queries for the IP address of “example.com”, it will receive the IP address 192.168.1.100, and the resolver or client will cache this information for 1 hour (3600 seconds) before it needs to query the DNS server again for the updated IP address.
How TTL works in DNS?
The DNS TTL (Time to Live) is a setting that specifies how long a DNS record should be cached by DNS resolvers and clients before it expires. It is defined in seconds and helps determine how frequently DNS queries need to be made to obtain updated information.
When a DNS resolver or client queries for a domain name, such as “example.com”, it contacts a DNS server to retrieve the corresponding IP address. The DNS server includes the TTL value in the response along with the IP address. The resolver or client then caches this information locally for the duration specified by the TTL.
See also: Mastering the Linux Command Line — Your Complete Free Training Guide
We have a diagram to help you understand the entire process.
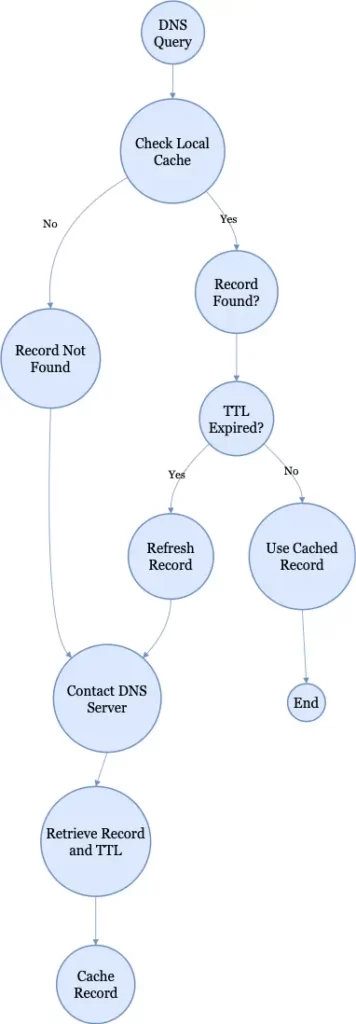
During the TTL period, subsequent DNS queries for the same domain name will use the cached information rather than contacting the DNS server again. This caching mechanism improves DNS query performance by reducing the number of requests made to the DNS server.
After the TTL expires, the resolver or client will consider the cached information stale and will need to query the DNS server again to get updated information. This ensures that any changes made to DNS records, such as IP address changes or record deletions, can be propagated to the clients within a reasonable time.
The TTL value is set by the owner/administrator of the DNS zone and can vary for different types of DNS records. Shorter TTL values, such as a few minutes or seconds, are often used for records that are expected to change frequently, while longer TTL values, such as hours or days, are used for records that change infrequently.
It’s important to note that reducing the TTL value too much can increase DNS query traffic and load on the DNS servers, while setting it too high may delay the propagation of DNS changes. Therefore, selecting an appropriate TTL value requires considering the balance between performance, flexibility, and timely updates of DNS records.
Check DNS TTL with nslookup command
The best way to check DNS TTL is using nslookup command. Open the terminal and type nslookup -debug domain name. It will display the ttl value of this DNS record. This command is available on most systems.
It is a network diagnostic tool that allows users to query the Domain Name System (DNS) for information about internet hosts.The nslookup command can be used to perform the following tasks:
- Resolve domain names to IP addresses
- Retrieve MX records for a domain
- Retrieve the name servers for a domain
% nslookup -debug www.howtouselinux.com

Server: 64.104.76.247

Address: 64.104.76.247#53
QUESTIONS:

www.howtouselinux.com, type = A, class = IN

ANSWERS:

www.howtouselinux.com

internet address = 162.159.138.9

ttl = 0

www.howtouselinux.com

internet address = 162.159.137.9

ttl = 0
Higher or Lower DNS TTL?
If the TTL is set too high, then the new DNS record cannot be updated on the client-side, as the change will take too long to take effect with any existing users.
Setting a very low TTL, however, adds extra overhead, as DNS lookups have to happen much more regularly, which adds to the page load time for a user and increases the stress on the DNS servers.
The default setting for TTL values was traditionally 24 hours, and it was usual to have to wait over a day for the impact of DNS changes to take effect.
Can we Set Shorter TTLs?
Yes, we can set shorter TTLs. However, it can cause heavier loads on an authoritative nameserver, but can be useful when changing the address of critical services like web servers or MX records (mail server pointers), and therefore are often lowered by the DNS administrator prior to a service being moved, in order to minimize disruptions.
Common TTL Values in DNS
Usually, TTL value is 86400 seconds, which is 24 hours. This is a good starting point for most records. However, we can set higher TTL for MX or CNAME records as they are expected to change very rarely. If our service is critical, it is recommended that we set TTL to 1 hour (3600 seconds).
DNS TTL best practices
For the most part, there is no need to change our TTL. However, if we know that we will be making a big DNS change soon, and we want the changes to take effect quickly, we may want to change our TTL ahead of time.
At least 24 hours ahead of time, update our TTL to a shorter value. For example, we may want to change it to 3600 (1 hour).
When our work is done, be sure to go back and return our TTL settings to their original values. DNS caching is an important way to reduce load on the servers, and it is best to keep this traffic low.
Check DNS TTL with dig command
Another way to look up TTL settings is to use the dig utility. It is available on Linux, Unix, and Mac OS X. From the shell (command line), type: dig example.com
This will return the DNS information (including TTL values) for the domain name.
;; ANSWER SECTION:

google.com. 0 IN A 142.251.12.139

google.com. 0 IN A 142.251.12.113

google.com. 0 IN A 142.251.12.100

google.com. 0 IN A 142.251.12.102

google.com. 0 IN A 142.251.12.138
Here we can see that the ttl is 0 for these records.
When to Use a Long TTL
Here are the top records that should have longer TTL’s:
- MX record (points to the mail server)
- DKIM and SPF (usually configured with MX records)
- TXT record
- Records that point to the web server or CDN, A and CNAME records respectively, will typically have a longer TTL since they are rarely changed. For these, we would want to set a TTL of 12 hours to 1 day.
Keep in mind, we will need to lower the TTL and wait until caches expire (usually around a day) before making any changes.


