Excel’s XLOOKUP function, introduced as a powerful replacement for the traditional VLOOKUP and HLOOKUP functions, offers a more versatile and straightforward approach to searching data in spreadsheets.
However, like any advanced feature, users might sometimes encounter issues where XLOOKUP doesn’t work as anticipated. Understanding the root causes of these issues is essential for efficient spreadsheet management.
In this article, we delve into the various reasons why XLOOKUP might not function correctly and provide a comprehensive guide for troubleshooting and resolving these problems.
Whether you’re a seasoned Excel veteran or relatively new to its functionalities, the following insights and solutions will help ensure that you make the most out of the XLOOKUP feature.
Table of Contents
Check Excel Version
Compatibility: XLOOKUP is available in Microsoft Excel for Microsoft 365 and Excel 2019. If you’re using an older version of Excel (like Excel 2016 or earlier), XLOOKUP will not be available. In such cases, you might need to use VLOOKUP or INDEX and MATCH as alternatives.
Checking the version of Microsoft Excel you are using is straightforward. Here’s how you can do it:
For Windows:
- Open Excel: Start Microsoft Excel.
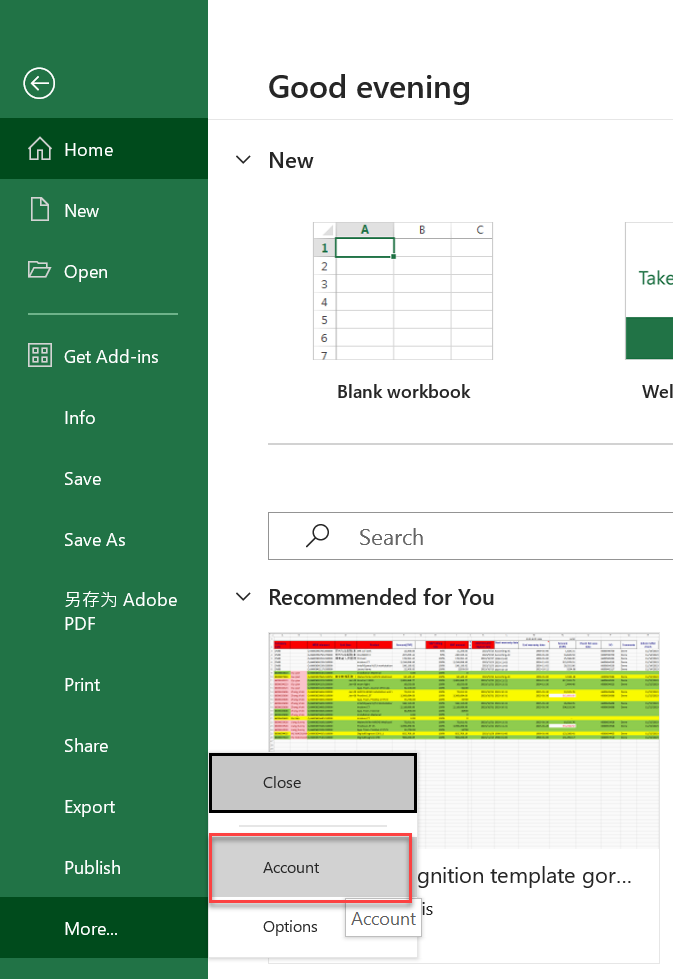
- Go to Account or File:
- Click on the File tab in the ribbon.
- In the File menu, select Account (In some versions, it might be under Help).

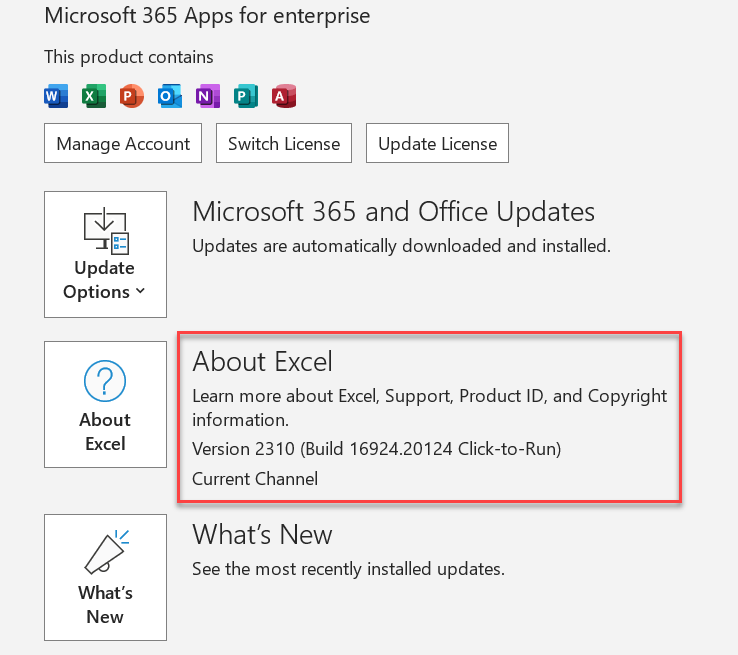
- Product Information:
- Under the Product Information section, you’ll find information about your Excel version and, if applicable, your Office suite.
- Click on About Excel to see a dialog box with detailed version information, including whether it’s a 32-bit or 64-bit version.

For Mac:
- Open Excel: Open Microsoft Excel on your Mac.
- Excel Menu:
- Click on the Excel menu item in the menu bar at the top of the screen.
- About Excel:
- Select About Excel. A pop-up window will appear.
- This window will display the version number of Excel you are using.
Check Xlookup Syntax
- Verify Syntax: Ensure that you are using the correct syntax for XLOOKUP:
XLOOKUP(lookup_value, lookup_array, return_array, [if_not_found], [match_mode], [search_mode]) - Parameters: Check if all required arguments (lookup_value, lookup_array, and return_array) are correctly specified.
Parameters
See also: Mastering the Linux Command Line — Your Complete Free Training Guide
- lookup_value – The value to search for in the lookup_array. Can be a number, text, logical value, or cell reference.
- lookup_array – The array or range to search.
- return_array – The array or range from which to return a value.
- [if_not_found] (Optional) – The value to return if lookup_value is not found. Defaults to #N/A if omitted.
- [match_mode] (Optional) – 0: Exact match (default). -1: Exact match or next smaller item. 1: Exact match or next larger item. 2: Wildcard match.
- [search_mode] (Optional) – 1: Search first-to-last (default). -1: Search last-to-first. 2 or -2: Binary search in ascending or descending order.
Examples
- Basic Use
=XLOOKUP(A1, B1:B10, C1:C10)Search for A1 in B1:B10 and return from C1:C10.
- Not Found Message
=XLOOKUP("Item", A1:A10, B1:B10, "Not Found")If “Item” isn’t found, returns “Not Found”.
- Wildcard Search
=XLOOKUP("*part*", A1:A10, B1:B10)Searches for any occurrence of “part”.
Check Data Types
Matching Data Types: Ensure that the data type of your lookup_value matches the data type in your lookup_array. For instance, if you’re looking up a number, make sure that the lookup array doesn’t contain text-formatted numbers.
Example: Matching Data Types in XLOOKUP
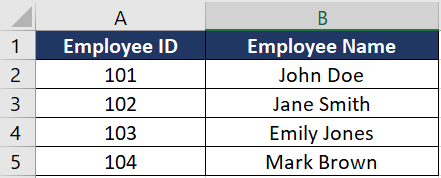
Scenario We have a list of employee IDs (as numbers) and their corresponding names. We want to use XLOOKUP to find the name of an employee based on their ID.

Data Setup
- Column A (A2:A10) contains employee IDs as numbers (e.g., 101, 102, 103, etc.).
- Column B (B2:B10) contains employee names (e.g., John Doe, Jane Smith, etc.).
Task Find the name of the employee with ID 103.
Potential Issue If the employee ID you’re looking up (103) is in a cell formatted as a text, but the IDs in your lookup array (Column A) are formatted as numbers, the XLOOKUP function may not work correctly.

Solution Format the data consistently. Convert the lookup value to number using the =VALUE() function, e.g., =XLOOKUP(VALUE(D2), A2:A10, B2:B10).
Check Cell References
Reference Errors: Check if the cell references in your formula are correct and pointing to the intended cells or ranges.
In Excel, cell references are crucial for ensuring that formulas work correctly. Reference errors can occur if the cell references in a formula are incorrect or not pointing to the intended cells or ranges.
Now, let’s consider a few scenarios where reference errors might occur and how to address them:
- Incorrect Cell References: If you accidentally reference the wrong cells, say A2 and B2 instead of A1 and B1, the formula will calculate the sum of the wrong cells. To fix this, double-check the cell references in your formula and correct them if necessary.
- References to Empty Cells: If either A1 or B1 is empty, the formula will only sum the value in the non-empty cell. While this is not an error, it may not be the intended result. Ensure that the cells referenced in your formula contain the data you expect to calculate.
- References to Cells with Non-Numeric Data: If A1 or B1 contains text or other non-numeric data, the SUM function ignores these cells, which might not be the intended behavior. Verify that all cells in your formula contain numeric data if you are performing a calculation like summing.
- References to Deleted or Moved Cells: If you delete or move cells A1 or B1 after creating the formula, Excel will show a #REF! error, indicating a broken reference. You will need to update the formula to refer to the new cell locations or restore the deleted cells.
- Using Relative vs. Absolute References: If you copy and paste the formula to another cell, relative references (like A1 and B1) will change based on the new location. This could lead to incorrect calculations if not intended. Use absolute references (like $A$1 and $B$1) if you want to maintain the same cell references when copying the formula.
Check Spelling and Case Sensitivity
- Spelling: Make sure there are no spelling errors in the values you are trying to match.
- Case Sensitivity: XLOOKUP is case-insensitive. However, if your data requires case-sensitive matching, you might need to adjust your approach.
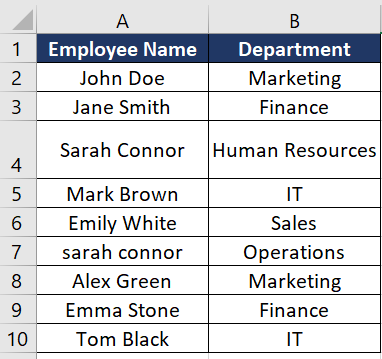
Here’s a table representing the data setup for the above example.

In this table: Column A (Employee Name) lists the names of the employees. Column B (Department) lists their corresponding departments.
The task involves using XLOOKUP to find the department for “Sarah Connor”. However, the presence of both “Sarah Connor” and “sarah connor” in the table illustrates the case sensitivity issue, where XLOOKUP will return the department for the first match found, regardless of the case.
If you’re still facing issues with XLOOKUP after trying these solutions, please feel free to leave a comment for further assistance.


blank space can be the issue. I got this many times. Thanks for the article. It’s very helpful. Thanks.
This fixed my issue. Thank you.
Matching Data Types: Ensure that the data type of your lookup_value matches the data type in your lookup_array.
Thanks for the detailed examples. It helps me a lot.