Table of Contents
What Is SELinux?
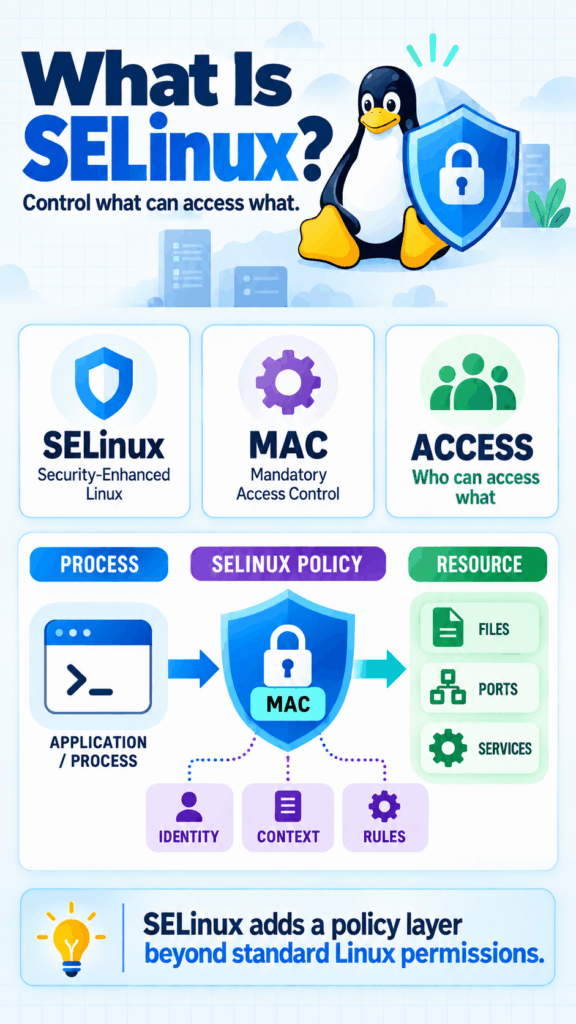
SELinux (Security-Enhanced Linux) is a mandatory access control (MAC) security mechanism built into the Linux kernel. Originally developed by the U.S. National Security Agency (NSA) and released to the open-source community in 2000, it is now maintained by Red Hat and the broader Linux community. SELinux enforces fine-grained security policies that govern how processes, users, and files can interact — going far beyond what traditional Linux permissions allow.
In short: even if a process is compromised or misconfigured, SELinux can confine the damage it can do.
Why SELinux Exists: DAC vs. MAC
To appreciate SELinux, you need to understand the model it improves upon.
Discretionary Access Control (DAC)
Traditional Linux uses Discretionary Access Control. Permissions are based on user and group ownership (rwx bits, chmod, chown). The critical weakness: the owner of a resource decides who can access it, and the all-powerful root user bypasses these checks entirely.
The problem: if a network service running as root is compromised, the attacker inherits root’s unrestricted access to the entire system.
Mandatory Access Control (MAC)
SELinux adds a Mandatory Access Control layer. Access rules are defined by a central, administrator-controlled policy that even root cannot override at will. Every access request is checked against this policy, regardless of standard file permissions.
The result: a compromised web server confined by SELinux can only touch the specific files and ports its policy allows — not the whole system.
Key principle: SELinux operates on a deny-by-default model. If the policy does not explicitly allow an action, it is denied.
How SELinux Works
Security Contexts (Labels)
The heart of SELinux is labeling. Every subject (process) and object (file, directory, port, socket, etc.) is assigned a security context. You can view these labels with the -Z flag on common commands:
ls -Z /var/www/html/index.html
# -rw-r--r--. root root unconfined_u:object_r:httpd_sys_content_t:s0 index.html

ps -eZ | grep httpd
# system_u:system_r:httpd_t:s0    1234 ? 00:00:00 httpd
A context has four parts, separated by colons:
See also: Mastering the Linux Command Line — Your Complete Free Training Guide
user:role:type:level
     │    │    │     └── MLS/MCS sensitivity level (e.g., s0)
     │    │    └──────── Type (the most important field)
     │    └───────────── Role
     └────────────────── SELinux user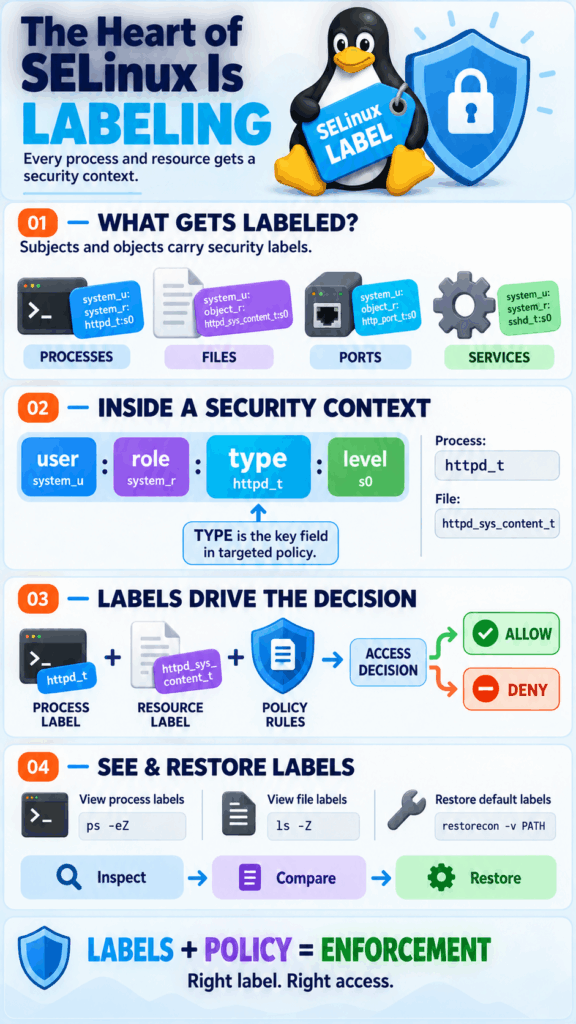
Type Enforcement (The Core Mechanism)
The most widely used SELinux model is Type Enforcement (TE). It focuses on the type field of the context:
- Processes run in a domain (e.g.,
httpd_tfor the Apache web server). - Files are labeled with a type (e.g.,
httpd_sys_content_tfor web content). - The policy defines which domains can access which types, and how.
For example, the policy says the httpd_t domain may read files of type httpd_sys_content_t. If Apache tries to read a file labeled user_home_t (a user’s home directory file), SELinux denies it — even if the Unix permissions would allow it.
The Decision Flow
When a process tries to access a resource:
- Standard DAC checks run first (
rwxpermissions). If DAC denies, access is refused immediately. - If DAC allows, SELinux checks the request against its policy.
- The Access Vector Cache (AVC) caches decisions for performance.
- If the policy allows, access proceeds. If not, it’s denied and logged.
SELinux Modes
SELinux runs in one of three modes, checked with the getenforce command:
| Mode | Behavior |
|---|---|
| Enforcing | Policy is enforced; violations are blocked and logged. (Recommended for production) |
| Permissive | Policy is not enforced, but violations are logged. Ideal for troubleshooting and testing new policies. |
| Disabled | SELinux is completely off. Not recommended. |
Managing modes:
getenforce                 # Show current mode
sestatus                   # Detailed status
setenforce 0               # Switch to Permissive (temporary)
setenforce 1               # Switch to Enforcing (temporary)
For a permanent change, edit /etc/selinux/config:
SELINUX=enforcing
SELINUXTYPE=targeted
⚠️ Never switch from
disabledstraight toenforcingafter a reboot without relabeling — the filesystem may lack proper labels. Use permissive first, or trigger a relabel withtouch /.autorelabel && reboot.
SELinux Policy Types
The SELINUXTYPE setting determines which policy is loaded:
- Targeted (default on RHEL/Fedora/CentOS): Only specific, high-risk processes (network daemons like
httpd,sshd,named) are confined. Everything else runs in the unconfinedunconfined_tdomain. This balances security and usability. - MLS (Multi-Level Security): A strict, label-based model used in high-security government and military environments, based on the Bell-LaPadula model.
- Minimum: A lightweight variant of targeted that confines only a minimal set of processes.
Working with SELinux: Practical Commands
Viewing Contexts
ls -Z file.txt             # File context
ps -eZ                     # Process contexts
id -Z                      # Your current user context
netstat -Z / ss -Z         # Socket contexts
Managing File Contexts
Two commands change file labels — but there’s an important distinction:
# Temporary change (lost on relabel)
chcon -t httpd_sys_content_t /web/index.html

# Permanent change: update the policy's file-context database
semanage fcontext -a -t httpd_sys_content_t "/web(/.*)?"
restorecon -Rv /web # Apply the labels from policy- Use
chconfor quick, temporary fixes. - Use
semanage fcontext+restoreconfor permanent, relabel-safe changes.restoreconresets a file’s context to what the policy dictates.
Managing Ports
To let a service listen on a non-standard port:
# Allow Apache (http_port_t) to use port 8888
semanage port -a -t http_port_t -p tcp 8888
semanage port -l | grep http_port_t   # List allowed ports
SELinux Booleans
Booleans are on/off switches that toggle predefined policy behaviors without writing custom policy:
getsebool -a                          # List all booleans
getsebool httpd_can_network_connect   # Check one

# Allow Apache to make outbound network connections (persistently)
setsebool -P httpd_can_network_connect on
The -P flag makes the change persistent across reboots.
Troubleshooting SELinux
When something breaks and you suspect SELinux, denials are logged as AVC (Access Vector Cache) messages.
Finding Denials
# View denials from the audit log
ausearch -m avc -ts recent

# Or check the audit log directly
grep "AVC" /var/log/audit/audit.log
Human-Readable Analysis
The sealert and audit2why tools translate cryptic denials into plain explanations and suggested fixes:
# Explain why a denial happened
audit2why < /var/log/audit/audit.log

# Detailed analysis with suggestions (from setroubleshoot-server)
sealert -a /var/log/audit/audit.log
Generating Custom Policy (Use With Caution)
If a legitimate action is being blocked and no boolean or label fix applies, you can generate a custom policy module:
ausearch -m avc -ts recent | audit2allow -M mymodule
semodule -i mymodule.pp
⚠️ Warning: Never blindly apply
audit2allowoutput. It can grant broad permissions that undermine security. Always understand why the denial occurred first — the correct fix is often a relabel or a boolean, not a new policy rule.
A Real-World Example
Suppose you move your website to a custom directory, /srv/mysite, and Apache returns 403 Forbidden even though Unix permissions look correct.
The cause: files in /srv/mysite carry the wrong SELinux type (e.g., var_t), which httpd_t cannot read. The fix:
# 1. Confirm it's SELinux
ausearch -m avc -ts recent | grep httpd

# 2. Add the correct context rule permanently
semanage fcontext -a -t httpd_sys_content_t "/srv/mysite(/.*)?"

# 3. Apply the labels
restorecon -Rv /srv/mysite

# 4. Verify
ls -Z /srv/mysite
Apache can now serve the content — without disabling SELinux.
Best Practices
- Keep SELinux in Enforcing mode. Disabling it removes an entire security layer. Use permissive for debugging, not disabled.
- Fix labels, don’t disable. The vast majority of “SELinux problems” are just mislabeled files — solvable with
restoreconorsemanage. - Prefer booleans and
semanageover custom policy modules. - Understand denials before allowing them. A denial may be SELinux correctly stopping an attack.
- Relabel after major changes with
restorecon -Ror a full/.autorelabel. - Install helper tools:
policycoreutils,policycoreutils-python-utils, andsetroubleshoot-serverprovidesemanage,audit2allow, andsealert.
Common Misconceptions
- “SELinux is too hard, just turn it off.” — Modern targeted policy is largely transparent; most issues are simple labeling fixes.
- “SELinux replaces the firewall/permissions.” — No. It complements DAC permissions and firewalls as an additional, independent layer (defense in depth).
- “Root can do anything.” — Under SELinux enforcing mode, even root is confined by policy.
Hands-On Lab: SELinux from Zero to Confident
A self-contained tutorial for a disposable test VM. By the end, you’ll have created an SELinux denial with your own hands, learned to read it, and fixed it three different ways — labels, ports, and booleans.
Before You Begin
What You Need
- A test VM running a RHEL-family distro (Fedora, Rocky Linux, AlmaLinux, or CentOS Stream). SELinux is enabled by default there.
- Root or
sudoaccess. - ~30–45 minutes.
⚠️ Use a throwaway VM, not a production machine. You will deliberately break and fix things.
Install the Helper Tools
sudo dnf install -y httpd policycoreutils policycoreutils-python-utils \
                    setroubleshoot-server audit
These give you semanage, audit2allow, sealert, and the audit log.
Confirm Your Starting Point
sudo sestatusYou should see:
SELinux status:      enabled
Current mode:        enforcing
Loaded policy name:  targeted
If Current mode is not enforcing, turn it on for the lab:
sudo setenforce 1
getenforce      # should now print: Enforcing
Part 1 — See Labels in Action (5 min)
Goal: Understand that everything has a security context.
# Look at your own context
id -Z
# unconfined_u:unconfined_r:unconfined_t:s0

# Look at the web server's default content directory
ls -Zd /var/www/html
# ... system_u:object_r:httpd_sys_content_t:s0 /var/www/html

# Start Apache and look at its process domain
sudo systemctl enable --now httpd
ps -eZ | grep httpd | head -1
# system_u:system_r:httpd_t:s0 ... /usr/sbin/httpd
What you learned: The web server runs in the httpd_t domain, and its content directory is the httpd_sys_content_t type. The policy links these two together. Keep this pairing in mind — it’s the key to everything that follows.
Checkpoint: Visit the server to confirm it’s alive.
echo "<h1>Default page</h1>" | sudo tee /var/www/html/index.html
curl http://localhost/
# <h1>Default page</h1>
Part 2 — Deliberately Trigger a Denial (10 min)
Goal: Break something with a wrong label, then read the denial.
We’ll serve content from a custom directory, which will have the wrong SELinux type.
# 1. Create a custom web root
sudo mkdir -p /myweb
echo "<h1>Custom directory page</h1>" | sudo tee /myweb/index.html

# 2. Check its label — note it is NOT httpd_sys_content_t
ls -Zd /myweb
# ... unconfined_u:object_r:default_t:s0 /myweb

# 3. Point Apache at the new directory
sudo sed -i 's#DocumentRoot "/var/www/html"#DocumentRoot "/myweb"#' \
     /etc/httpd/conf/httpd.conf

# 4. Also update the <Directory> block so DAC permits it
sudo tee -a /etc/httpd/conf/httpd.conf >/dev/null <<'EOF'

<Directory "/myweb">
    Require all granted
</Directory>
EOF

# 5. Restart and try to access it
sudo systemctl restart httpd
curl http://localhost/
# <title>403 Forbidden</title>   <-- SELinux is blocking us!
The DAC trap: The files are world-readable and the config is correct, yet you get 403 Forbidden. This is the classic sign of an SELinux denial — permissions look fine, but access is blocked.
Read the Denial
# The human-friendly way
sudo ausearch -m avc -ts recent
You’ll see something like:
type=AVC msg=audit(...): avc: denied { getattr } for pid=...
  comm="httpd" path="/myweb/index.html"
  scontext=system_u:system_r:httpd_t:s0
  tcontext=unconfined_u:object_r:default_t:s0 tclass=file
Read it like a sentence:
denied { getattr }→ the action that was blockedcomm="httpd"→ who triedscontext=...httpd_t→ the source domain (Apache)tcontext=...default_t→ the target’s type — this is the problem. Apache’s domain isn’t allowed to readdefault_tfiles.
Get a Plain-English Explanation
sudo sealert -a /var/log/audit/audit.logsealert will literally suggest the fix: relabel /myweb to a type Apache can read.
Checkpoint: You’ve created and correctly diagnosed your first denial. 🎉
Part 3 — Fix #1: Relabel Files (10 min)
Goal: Fix the denial the right way — by correcting the label.
# 1. Add a PERMANENT rule mapping /myweb to the web content type
sudo semanage fcontext -a -t httpd_sys_content_t "/myweb(/.*)?"

# 2. Apply the new label to existing files
sudo restorecon -Rv /myweb
# Relabeled /myweb/index.html from ...default_t... to ...httpd_sys_content_t...

# 3. Verify the label changed
ls -Zd /myweb
# ... httpd_sys_content_t:s0 /myweb

# 4. Test again — no restart needed
curl http://localhost/
# <h1>Custom directory page</h1>   <-- Success!
Why two commands?
semanage fcontextrecords the rule in the policy database (survives relabels and reboots).restoreconactually applies that rule to files on disk.
💡 Compare with the shortcut:
chcon -t httpd_sys_content_t /mywebwould also work right now, but the label would be lost the next time the filesystem is relabeled. Always prefer thesemanage+restoreconcombo for permanent fixes.
Part 4 — Fix #2: Allow a Non-Standard Port (10 min)
Goal: Make Apache listen on port 8080 and see SELinux block, then allow, the port.
# 1. Tell Apache to listen on 8080
echo "Listen 8080" | sudo tee -a /etc/httpd/conf/httpd.conf

# 2. Restart — it FAILS
sudo systemctl restart httpd
# Job for httpd.service failed...

# 3. Confirm SELinux is the cause
sudo ausearch -m avc -ts recent | grep 8080
# avc: denied { name_bind } ... tcontext=...http_port_t? No -> unreserved_port_t

# 4. See which ports httpd is currently allowed to bind
sudo semanage port -l | grep http_port_t
# http_port_t   tcp   80, 81, 443, 488, 8008, 8009, 8443, 9000

# 5. Add 8080 to the allowed list
sudo semanage port -a -t http_port_t -p tcp 8080

# 6. Restart — now it works
sudo systemctl restart httpd
curl http://localhost:8080/
# <h1>Custom directory page</h1>
What you learned: SELinux protects ports too, not just files. A service can only bind to ports whose type its domain is allowed to use.
Part 5 — Fix #3: Flip a Boolean (5 min)
Goal: Enable a whole behavior with a single switch.
Imagine your web app needs to make outbound network connections (e.g., to call an API). SELinux blocks this by default.
# 1. Check the current state
getsebool httpd_can_network_connect
# httpd_can_network_connect --> off

# 2. Turn it on PERMANENTLY (the -P flag)
sudo setsebool -P httpd_can_network_connect on

# 3. Confirm
getsebool httpd_can_network_connect
# httpd_can_network_connect --> on
What you learned: Booleans are pre-built policy toggles. They’re the easiest and safest way to enable common scenarios — no relabeling or custom policy required.
Explore what else you can toggle:
sudo semanage boolean -l | grep httpd
Part 6 — Enforcing vs. Permissive (5 min)
Goal: Feel the difference between the modes.
# 1. Break something again — remove the good label from /myweb
sudo semanage fcontext -d "/myweb(/.*)?"
sudo chcon -t default_t -R /myweb
curl http://localhost:8080/        # 403 Forbidden again

# 2. Switch to PERMISSIVE (temporary)
sudo setenforce 0
getenforce                         # Permissive

# 3. Try again — it WORKS, but the denial is still LOGGED
curl http://localhost:8080/        # <h1>Custom directory page</h1>
sudo ausearch -m avc -ts recent | tail -3   # denial still recorded

# 4. Switch back to ENFORCING and re-apply the proper fix
sudo setenforce 1
sudo semanage fcontext -a -t httpd_sys_content_t "/myweb(/.*)?"
sudo restorecon -Rv /myweb
curl http://localhost:8080/        # works, the correct way
Key insight: Permissive mode is a diagnostic tool, not a fix. It lets a broken app run while still logging every violation — perfect for discovering all the denials at once before you commit to fixes. Never leave a production system permissive as a “solution.”
Cleanup
Undo everything the lab created:
# Stop and disable the web server
sudo systemctl disable --now httpd

# Remove the custom SELinux rules you added
sudo semanage fcontext -d "/myweb(/.*)?"  2>/dev/null
sudo semanage port -d -t http_port_t -p tcp 8080  2>/dev/null
sudo setsebool -P httpd_can_network_connect off

# Remove the test directory
sudo rm -rf /myweb

# (Optional) reinstall a clean httpd config
sudo dnf reinstall -y httpd
What You Accomplished
You can now:
- ✅ Read a security context and understand the domain ↔ type relationship.
- ✅ Recognize the tell-tale sign of an SELinux denial (403/permission errors despite correct DAC).
- ✅ Find and interpret AVC denials with
ausearchandsealert. - ✅ Fix denials three ways: file labels (
semanage fcontext+restorecon), ports (semanage port), and booleans (setsebool -P). - ✅ Use permissive mode as a debugging aid rather than a crutch.
Quick-Reference Cheat Sheet
| Task | Command |
|---|---|
| Check status/mode | sestatus / getenforce |
| Set mode (temp) | sudo setenforce 0 (permissive) / 1 (enforcing) |
| View file context | ls -Z <file> |
| View process context | ps -eZ |
| Find recent denials | sudo ausearch -m avc -ts recent |
| Explain denials | sudo sealert -a /var/log/audit/audit.log |
| Add file label rule | sudo semanage fcontext -a -t <type> "<path>(/.*)?" |
| Apply labels | sudo restorecon -Rv <path> |
| Allow a port | sudo semanage port -a -t <type> -p tcp <port> |
| List booleans | getsebool -a / semanage boolean -l |
| Toggle boolean | sudo setsebool -P <boolean> on |
Next Steps
- Try the same workflow with a different service (e.g.,
vsftpdornginx) to see how domains differ. - Experiment with
semanage permissive -a <domain>to make just one service permissive while the rest stay enforced. - Read the man pages:
man semanage-fcontext,man booleans,man selinux.
Conclusion
SELinux transforms Linux security from a discretionary, owner-controlled model into a mandatory, policy-enforced one. By labeling every process and resource and enforcing a deny-by-default policy, it dramatically limits the blast radius of compromised services and misconfigurations.
While it has a reputation for complexity, the reality on modern systems is manageable: understand contexts, know the difference between enforcing/permissive modes, use booleans and semanage for configuration, and rely on ausearch/sealert for troubleshooting. Rather than disabling it at the first sign of trouble, learning to work with SELinux gives you one of the most powerful defense-in-depth tools available on Linux.