The Linux operating system offers a plethora of powerful commands, each designed to perform specific tasks efficiently. One such command is ‘useradd,’ which plays a crucial role in managing user accounts on a Linux system.
Whether you are a system administrator or an aspiring Linux enthusiast, understanding the ins and outs of the ‘useradd’ command is essential.
In this comprehensive guide, we will dive deep into the functionality and versatility of the ‘useradd’ command.
We will explore its various options, parameters, and usage scenarios, enabling you to harness the full potential of this command for managing user accounts effectively.
To learn more about how useradd command works behind the scenes, you can refer to this article: Understanding the useradd Command in Linux
Table of Contents
Add a new user in Linux with useradd command
To add a new user in Linux with the useradd command, you can follow these steps:
- Open your terminal. Type the following command, replacing username with the name of the user you want to create:
sudo useradd username
This command creates a new user with the default settings. However, this user won’t have a password yet, so they can’t log in. - To set a password for the new user, type the following command:
sudo passwd username
Replace username with the name of the user you just created. You’ll be prompted to enter the password twice.Now, you’ve successfully added a new user and set a password for them. The user can log in with their username and the password you set.
Remember, you need to have sudo (superuser) privileges to use the useradd and passwd commands to create a new user and set a password. Otherwise you will get an error useradd user permission denied.
Also, it’s a good practice to replace username with a name that’s unique and doesn’t contain spaces or special characters.
Understanding useradd command in Linux
The useradd command in Linux allows you to add new users to the system. It is a power tool to manage user accounts.
See also: Mastering the Linux Command Line — Your Complete Free Training Guide
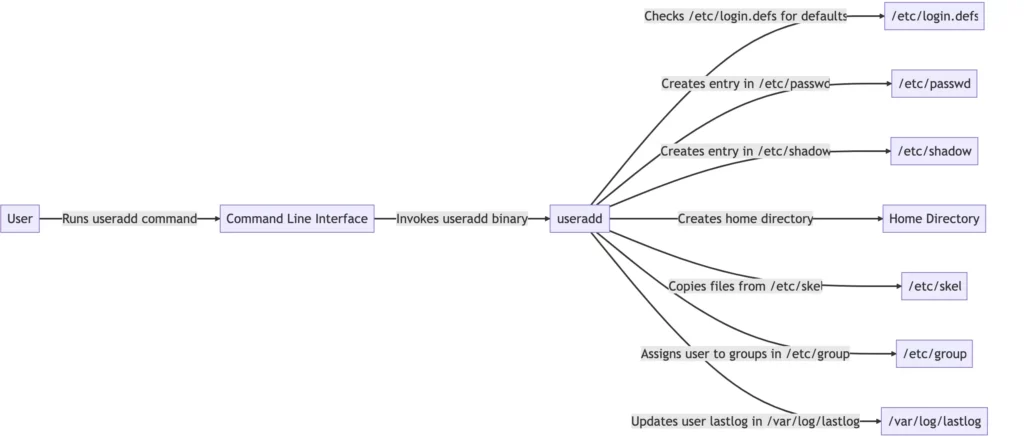
The useradd command performs the below tasks in Linux:
- It edits the files for newly created users like /etc/passwd, /etc/shadow, /etc/group and /etc/gshadow.
- It creates and opens a new home directory. By default, the new home directory is a copy of the /etc/skel directory and its contents.
- It allows us to set ownerships and permissions to the home directory.
The following two files define the default info for new users.
- /etc/login.defs – This file defines entries for mail, password complexity and limitations, UID and GID minimum and maximum values, and whether the user’s home directory is created by default.
- /etc/default/useradd – This file defines the defaults of shell, home directory, skel file, group id etc.
This diagram visually represents the process of the useradd command in Linux, illustrating how it interacts with various system files and directories to create a new user account.
useradd command options in Linux
The following options are commonly used options for useradd command.
| Option | Description |
|---|---|
| -d, –home HOME_DIR | The new user will be created using HOME_DIR as the value for the user’s login directory. |
| -e, –expiredate EXPIRE_DATE | The date on which the user account will be disabled. |
| -g, –gid GROUP | The group name or number of the user’s initial login group. |
| -G, –groups GROUPS | A list of supplementary groups which the user is also a member of. |
| -m, –create-home | Create the user’s home directory if it does not exist. |
| -s, –shell SHELL | The name of the user’s login shell. |
| -u, –uid UID | The numerical value of the user’s ID. |
useradd -d /home/howtouselinux -s /bin/bash -g my_group username
Add a user with home directory with useradd command in Linux
The “home directory” refers to the designated directory where each user has their own personal space for storing their files, configuration files, and user-specific settings.
It is also known as the user’s “home folder” or “user directory.”
When a user account is created, a home directory is typically assigned to that user. The path to the home directory follows the format of “/home/username”, where “username” is the name of the user account.
The -m option of useradd command allows to copy all files from our system skeleton directory (/etc/skel) to the newly created home directory.
In other words, we can create a user with home directory using the -m option.
useradd -m new_username
We can also specify an existing directory as the home directory of the newly created user with option -d.
useradd -d Path_to_Existing_Directory new_username
Add a new user with different group using useradd command in Linux
In Linux, a “group” refers to a collection of user accounts that share certain privileges or permissions.
Groups are used to organize users and manage their access to files, directories, and other resources on the system.
Every user account in Linux is associated with at least one group, known as the “primary group.”
The primary group is typically created automatically during the user’s creation and has the same name as the username.
However, a user can also be a member of multiple additional groups, known as “supplementary groups.”
Usually, when we create a new user, a group with the same name as the user is created. The new user is added as a member of this group.
With the option -g, we can add a new user to an already existing group as its primary group.
useradd -g Existing_Group_Name_or_ID new_username
Suppose we are creating an account for a developer. Adding all the developers to a ‘dev group’ could be a strategy. we can also add the user to additional (existing) groups with option -G.
useradd -G group_1 group_2 new_username
So if we are creating a sudo user, we can simply add the user to the sudo group while creating it.
Group Info for New User
If we specify the group info for this user with -g option, the new user will belong to that group.
In order to understand how the useradd command determines the group for new users when no group information is specified in the command line, we will examine the rules that are followed.
- check the /etc/logins.defs file , for the variable named: USERGROUPS_ENAB
- If USERGROUPS_ENAB is set to yes , useradd will create a group for that user which has a name same as the user username.
- If USERGROUPS_ENAB is set to no , then useradd will check the value of the variable GROUP defined inside : /etc/default/useradd
- If GROUP is defined and not commented out then useradd will add the user to the group specified by GROUP .
- If GROUP is not defined or is commented out, then useradd will assign the user to the group with the group id of 100 .
The following flow chart tells us how useradd works in Linux.

Add a new user with different shell using useradd command in Linux
In Linux, the term “shell” refers to the command-line interface or program that provides an interactive way for users to interact with the operating system.
It is a user interface that allows users to execute commands, run programs, and manage files and directories.
The shell interprets the commands entered by the user and executes them accordingly.
It provides features such as command history, tab completion, scripting capabilities, and various utilities for managing processes, input/output, and system configurations.
Each shell may have its own set of features, syntax, and configuration options, but they all serve the purpose of providing an interface for users to interact with the Linux operating system.
The default shell for a user created with useradd command is bash.
A user can change his/her default shell after it is created but we can also create the user with a different default shell with the option -s.
For example, to add a new user named “john” with the “/bin/zsh” shell, the command would be:
useradd -s /bin/zsh john
This command will create a new user with the specified shell, allowing them to use a different default shell than the system default.
Add a new user with specific user ID (UID) using useradd command in Linux
UID stands for “User Identifier” in Linux and other Unix-like operating systems.
It is a unique numerical value assigned to each user account on the system. The UID is used by the system to identify and differentiate between different users.
UIDs are typically assigned starting from a certain number, such as 0 (reserved for the root or superuser account) and incrementing from there.
Each user account is associated with a specific UID, which helps the system manage user permissions, file ownership, and access control.
The UID is an essential component of user management in Linux, allowing the system to identify and track users based on their unique numerical identifier.
we can create a new user with a specific user ID with the option -u of useradd command:
useradd -u uid new_username
we can combine multiple options together to create a new user in Linux with a predefined configuration.
useradd -d /home/howtouselinux -s /bin/bash -g my_group howtouselinux
Add a new user with expiration date using useradd command in Linux
When creating a user account with the useradd command, you can specify an expiration date for the password. Once the expiration date is reached, the user account is automatically expired. You have to reset a new password.
The expiration date is typically specified in the format of “YYYY-MM-DD”, representing the year, month, and day. By setting an expiration date for a user account, you can enforce a policy that limits the duration of access to the account, ensuring better control and security.
To create a user with an expiration date using the useradd command in Linux, you can utilize the -e or –expiredate option. Here’s an example:
useradd -e 2022-12-31 username
In the above command, replace “username” with the desired username for the new user, and set the expiration date using the format “YYYY-MM-DD”. This will create a user account with the specified expiration date.
Add a new user with inactive days using useradd command in Linux
In the useradd command, the “INACTIVE” refers to the variable that determines the number of days after a password has expired before the user account is disabled.
When the password for a user account expires, the user is typically required to change their password.
However, if the user does not change their password within the specified period the account will be considered disable.
To set the number of days after a password has expired before an account is disabled using the useradd command in Linux, you can utilize the -f or –inactive option. Here’s an example:
useradd -f 30 username
In the above command, replace “username” with the desired username for the new user, and set the number of days using the -f option.
Related Post:


It is really helpful. Thanks for the detailed info.