Linux commands are important for Linux beginners. This cheat sheet covers all the basic Linux commands. It can help Linux beginners learn Linux quickly.
We have compiled a pdf file that covers all the basic commands. You can download it and do some practice on your Linux servers.
Diving into Linux for the first time can be a bit overwhelming. We highly recommend this book “Practical Linux System Administration” as an excellent starting point.
This comprehensive book offers foundational insights and skills crucial for confidently maneuvering through the Linux Command Line Interface (CLI). It’s your guiding light, providing in-depth knowledge to bolster your command over Linux systems.
Here you can get the detailed review about this book.
- ls command – lists contents of current working directory
- cd command – change directory
- touch command – create new file
- rm command – remove file or directory
- mkdir command – create new directory
- head command – print first few lines of a file
- tail command – print last few lines of a file
- echo command – print string
- cat command – print contents of a file
- cp command – copy file or directory
- mv command – move file or directory
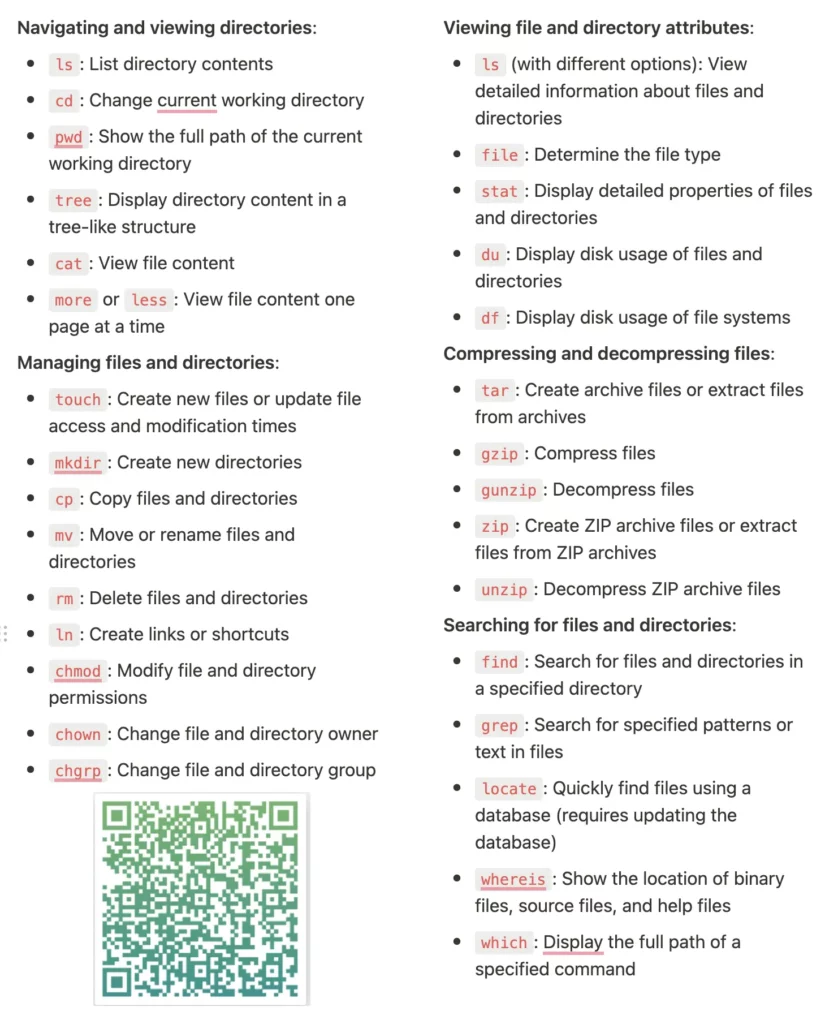
Navigating and viewing directories:
- ls: List directory contents
- cd: Change current working directory
- pwd: Show the full path of the current working directory
- tree: Display directory content in a tree-like structure
- cat: View file content
- more or less: View file content one page at a time
Managing files and directories:
- touch: Create new files or update file access and modification times
- mkdir: Create new directories
- cp: Copy files and directories
- mv: Move or rename files and directories
- rm: Delete files and directories
- ln: Create links or shortcuts
- chmod: Modify file and directory permissions
- chown: Change file and directory owner
- chgrp: Change file and directory group
Viewing file and directory attributes:
- ls (with different options): View detailed information about files and directories
- file: Determine the file type
- stat: Display detailed properties of files and directories
- du: Display disk usage of files and directories
- df: Display disk usage of file systems
Compressing and decompressing files:
- tar: Create archive files or extract files from archives
- gzip: Compress files
- gunzip: Decompress files
- zip: Create ZIP archive files or extract files from ZIP archives
- unzip: Decompress ZIP archive files
Searching for files and directories:
- find: Search for files and directories in a specified directory
- grep: Search for specified patterns or text in files
- locate: Quickly find files using a database (requires updating the database)
- whereis: Show the location of binary files, source files, and help files
- which: Display the full path of a specified command
pwd Command – Show the full path of the current working directory
The pwd command is a common command used in command-line interfaces (CLI) and operating systems to display the current working directory.
“PWD” stands for “Print Working Directory.” The current working directory refers to the directory (folder) in a file system where the user is currently located or working within.
When you enter the pwd command in a CLI, it typically outputs the absolute path of the current directory. An absolute path is the complete path that specifies the location of a directory or file from the root of the file system.
For example, if you are currently located in the directory /home/user/documents and you enter the pwd command, it would display /home/user/documents as the output, indicating that you are currently in the documents directory, which is inside the user directory, which is inside the home directory, and so on, until the root directory.
The pwd command is useful for quickly determining your current location in the file system, which can be helpful for navigating and managing files and directories using other commands.
It is often used in conjunction with other commands to perform tasks such as creating, moving, or deleting files and directories in a specific location.
This command prints the location of your current working directory. It’s important to know actually where you’re before going to a parent or subdirectories.
TO-M-F13P:~ root# pwd

/var/root
ls Command – View detailed information about files and directories
The ls command is a common command used in command-line interfaces (CLI) and operating systems to list the contents of a directory, which includes files and subdirectories. “LS” stands for “List.”
When you enter the ls command in a CLI, it typically displays the names of files and directories in the current directory, by default. You can also specify a directory or a path as an argument with the ls command to list the contents of a specific directory.
The ls command provides various options and flags that allow you to customize the output and behavior. Some commonly used options with the ls command are:
- -l: Displays a detailed long format listing, which includes file permissions, ownership, size, modification time, and other information.
- -a: Displays hidden files and directories, which are files and directories whose names start with a dot (.) and are normally not shown in the default output.
- -R: Recursively lists the contents of subdirectories as well.
- -h: Displays file sizes in a human-readable format, using units such as “K” for kilobytes, “M” for megabytes, etc.
- -t: Sorts the files and directories by modification time, with the most recently modified files or directories listed first.
For example, if you enter the command ls -l in a directory, it would display a detailed long format listing of the files and directories in that directory, including their permissions, ownership, size, modification time, and other information. If you enter the command ls -a /home/user/documents, it would list all the files and directories, including hidden ones, in the /home/user/documents directory.
The ls command is a powerful tool for navigating and managing files and directories in a CLI, allowing you to quickly view the contents of a directory and understand the properties of files and directories in a specific location.
ls is one of the most used basic linux commands, used to list contents of a directory, by default it lists contents of current working directory(pwd).
TO-M-F13P:~ root# ls
.CFUserTextEncoding .forward .python_history .viminfo Library
.cisco .lesshst .sh_history Application Support test
.datastax_studio .oracle_jre_usage .ssh Documents test.cap
cd command – change directory
The cd command is a common command used in command-line interfaces (CLI) and operating systems to change the current working directory to a different directory. “CD” stands for “Change Directory.”
When you enter the cd command followed by the name of a directory or a path as an argument, it changes the current working directory to the specified directory or path. The current working directory refers to the directory in a file system where the user is currently located or working within.
For example, if you are currently located in the directory /home/user/documents and you want to change to the directory /home/user/pictures, you can enter the following command:
cd /home/user/pictures
After executing this command, the current working directory would be changed to /home/user/pictures, and any subsequent commands or operations you perform would be relative to this new directory.
The cd command also provides some special directory names that can be used as shortcuts:
- .: Represents the current directory. For example, cd . would remain in the current directory.
- ..: Represents the parent directory. For example, cd .. would change to the parent directory of the current directory.
- ~: Represents the home directory of the current user. For example, cd ~ or cd without any argument would change to the home directory of the current user.
It’s important to note that changes made with the cd command are only effective within the current session of the CLI. Once you close the CLI or start a new session, the working directory would be reset to its default value.
The cd command is a fundamental tool for navigating and moving around in a file system using a CLI, allowing you to change your current location and perform operations on files and directories in different locations.
After knowing your pwd and getting an overview with the ls, it’s time to move around with cd command. Clarification, assume you’re on your Home directory, you need to go to the /usr/local/share/fonts directory, use cd /usr/local/share/fonts.
TO-M-F13P:~ root# cd /usr/local/share/
touch command – create new file
The primary purpose of the touch command is to create an empty file with the specified name or update the access and modification timestamps of an existing file.
When you enter the touch command followed by the name of a file as an argument, it creates a new file with that name in the current working directory, if a file with the same name does not already exist. If a file with the same name already exists, the touch command updates the access and modification timestamps of that file to the current time, without modifying the content of the file.
The basic syntax of the touch command is as follows:
touch [OPTIONS] FILE
Where [OPTIONS] are optional flags that can be used to customize the behavior of the touch command, and FILE is the name of the file that you want to create or update.
Some commonly used options with the touch command are:
- -a: Changes only the access timestamp of the file.
- -m: Changes only the modification timestamp of the file.
- -c: Does not create a new file if it does not already exist.
- -r: Uses the access and modification timestamps of an existing file as a reference to update another file.
- -t: Specifies a specific timestamp to set for the file.
For example, to create a new file called “howtouselinux.txt” in the current working directory, you can use the following command:
touch howtouselinux.txt
If you want to update the modification timestamp of an existing file called “file.txt”, you can use the following command:
touch -m file.txt
The touch command is a useful tool for creating new files quickly or updating the timestamps of existing files in a CLI. It is commonly used in shell scripts, automation tasks, and other scenarios where file manipulation is required.
The “touch” command is used to create new files. For example, the following command will create a new file called “/tmp/file1”:
touch /tmp/file1
If the “/tmp/file1” file already exists, the “touch” command will update the file’s modification time.
TO-M-F13P:~ root# touch howtouselinux
echo command – print string
The echo command is often used for displaying messages, displaying the values of variables, or generating output in scripts and command-line operations.
The basic syntax of the echo command is as follows:
echo [OPTIONS] [STRING]
Where [OPTIONS] are optional flags that can be used to customize the behavior of the echo command, and [STRING] is the text or variable whose value you want to print. If you do not provide any [STRING] argument, the echo command will simply print a newline character, effectively creating an empty line.
For example, to print the string “Hello, world!” to the standard output, you can use the following command:
echo "Hello, world!"
This will display the output “Hello, world!” in the terminal or console.
You can also use variables with the echo command to print the values of variables. For example, if you have a variable called name with the value “John”, you can print the value of the name variable using the following command:
name="John"

echo "My name is $name"
This will display the output “My name is John” in the terminal or console. Note that the variable is referenced using the $ symbol followed by the variable name, enclosed in curly braces {} for clarity.
Some commonly used options with the echo command are:
- -n: Prevents the trailing newline character from being printed, useful for suppressing the newline after the output.
- -e: Enables interpretation of escape sequences in the string, allowing you to include special characters or formatting in the output.
For example, to print a string without a trailing newline, you can use the following command:
echo -n "This is a string without a newline."
The echo command is a simple yet powerful tool for printing strings and values to the standard output in a CLI, and it is widely used in scripts, automation tasks, and other command-line operations for displaying messages or generating output.
The “echo” command is used to print text to the output. For example, the following command will print the text “Hello, world!”:
echo ‘Hello, world!’
cat command – print contents of a file
The cat command is often used for quickly viewing the contents of text files, concatenating files, or combining the contents of multiple files into a single output.
The basic syntax of the cat command is as follows:
cat [OPTIONS] [FILE...]
Where [OPTIONS] are optional flags that can be used to customize the behavior of the cat command, and [FILE…] are one or more file names or file paths whose contents you want to display. You can specify multiple files as arguments, and the cat command will concatenate their contents and display them in the order they are specified.
For example, to display the contents of a file called “example.txt” in the terminal or console, you can use the following command:
cat example.txt
This will print the contents of the “example.txt” file to the standard output.
You can also use the cat command to concatenate the contents of multiple files and display them together. For example, to display the contents of three files “file1.txt”, “file2.txt”, and “file3.txt” in the terminal or console, you can use the following command:
cat file1.txt file2.txt file3.txt
This will print the concatenated contents of the three files to the standard output in the order they are specified.
Some commonly used options with the cat command are:
- -n: Displays line numbers with the contents of the file(s).
- -b: Displays line numbers only for non-empty lines.
For example, to display the contents of a file with line numbers, you can use the following command:
cat -n example.txt
The cat command is a versatile tool for displaying the contents of text files and concatenating files in a CLI, and it is widely used in scripts, automation tasks, and other command-line operations for viewing and manipulating file contents.
It’s used to print the contents of a file to the screen(stdout more precisely), really useful when you want to have a quick look on the contents of a file. It is not suitable for a large file.
TO-M-F13P:~ root# cat howtouselinux
howtouselinux
cp command – copy file or directory
The cp command is often used for making backups, duplicating files or directories, or transferring files from one location to another.
The basic syntax of the cp command is as follows:
cp [OPTIONS] SOURCE DESTINATION
Where [OPTIONS] are optional flags that can be used to customize the behavior of the cp command, SOURCE is the file or directory that you want to copy, and DESTINATION is the location where you want to create the copy.
For example, to create a copy of a file called “file.txt” in the same directory with the name “file_copy.txt”, you can use the following command:
cp file.txt file_copy.txt
This will create a new file “file_copy.txt” with the same contents as “file.txt” in the same directory.
You can also use the cp command to copy entire directories and their contents. For example, to create a copy of a directory called “folder1” and all its contents into another directory called “folder2”, you can use the following command:
cp -r folder1 folder2
The -r option is used to specify that the cp command should copy directories recursively, including all their subdirectories and files.
Some commonly used options with the cp command are:
- -r: Copies directories and their contents recursively.
- -p: Preserves the original file attributes, such as timestamps and permissions.
- -f: Forces the copying of files, even if the destination file already exists and overwrites it without prompting for confirmation.
- -i: Prompts for confirmation before overwriting existing files.
For example, to copy a directory and preserve the original file attributes, you can use the following command:
cp -rp source_directory destination_directory
The cp command is a powerful tool for creating copies of files and directories in a CLI, and it is widely used in scripts, automation tasks, and other command-line operations for duplicating and transferring files.
cp , You can copy files and directories with this command. Typical usage is like cp file_a file_a_copy or cp dir_a dir_a_copy.
TO-M-F13P:~ root# cp howtouselinux howtouselinux_copy
TO-M-F13P:~ root# ls -lrt howtouselinux*
-rw-r–r– 1 root staff 14 Nov 7 11:39 howtouselinux
-rw-r–r– 1 root staff 14 Nov 7 11:41 howtouselinux_copy
mv command – move file or directory
The mv command is often used for organizing files, renaming files or directories, or transferring files from one location to another.
The basic syntax of the mv command is as follows:
mv [OPTIONS] SOURCE DESTINATION
Where [OPTIONS] are optional flags that can be used to customize the behavior of the mv command, SOURCE is the file or directory that you want to move or rename, and DESTINATION is the location where you want to move or rename the file or directory.
For example, to move a file called “file.txt” to a different directory called “new_directory”, you can use the following command:
mv file.txt new_directory/
This will move the file “file.txt” to the “new_directory” directory.
You can also use the mv command to rename files or directories. For example, to rename a file called “old_file.txt” to “new_file.txt”, you can use the following command:
mv old_file.txt new_file.txt
This will rename the file “old_file.txt” to “new_file.txt” in the same directory.
The mv command is used to move or rename directories and files. To rename a file use mv old_name new_name
TO-M-F13P:~ root# mv howtouselinux howtouselinux_new
TO-M-F13P:~ root# ls -lrt howtouselinux_*
-rw-r–r–@ 1 root staff 14 Nov 7 11:39 howtouselinux_new
-rw-r–r– 1 root staff 14 Nov 7 11:41 howtouselinux_copy
rm command – remove file or directory
The rm command is often used for deleting files, cleaning up disk space, and removing unwanted files or directories.
The basic syntax of the rm command is as follows:
rm [OPTIONS] FILE(S) or DIRECTORY(S)
Where [OPTIONS] are optional flags that can be used to customize the behavior of the rm command, and FILE(S) or DIRECTORY(S) are the files or directories that you want to remove.
For example, to remove a file called “file.txt”, you can use the following command:
rm file.txt
This will delete the file “file.txt” from the file system permanently.
You can also use the rm command to remove multiple files at once by specifying their names separated by spaces. For example, to remove three files called “file1.txt”, “file2.txt”, and “file3.txt”, you can use the following command:
rm file1.txt file2.txt file3.txt
Similarly, you can use the rm command to remove entire directories and their contents recursively by using the -r option. For example, to remove a directory called “directory1” and all its contents, you can use the following command:
rm -r directory1
Be cautious when using the rm command with the -r option, as it will delete the specified directory and its contents permanently without any confirmation. Make sure to double-check the directory path and contents before using this option.
Some commonly used options with the rm command are:
- -r: Removes directories and their contents recursively.
- -f: Forces the removal of files and directories without prompting for confirmation, even if they are write-protected or do not exist.
- -i: Prompts for confirmation before removing each file or directory.
- -v: Displays verbose output, showing the files and directories being removed.
For example, to remove a directory and its contents recursively with verbose output, you can use the following command:
rm -rv directory1
The rm command is a powerful tool for removing files and directories in a CLI, and it should be used with caution to avoid accidental deletion of important files or directories. It is recommended to double-check the files and directories to be deleted and use appropriate options to ensure the desired behavior of the rm command.
The rm command is used to remove directory or files. Like use rm -r /tmp/backup to remove everything that directory. Of course you’ve to be careful before removing anything.
TO-M-F13P:~ root# rm howtouselinux_new
TO-M-F13P:~ root# ls -lrt howtouselinux_*
-rw-r–r– 1 root staff 14 Nov 7 11:41 howtouselinux_cop
mkdir command – create new directory
The basic syntax for the mkdir command is as follows:
mkdir [options] directory_name
where options are optional flags that modify the behavior of the mkdir command, and directory_name is the name of the directory you want to create.
Here’s an example of how you might use the mkdir command to create a new directory called “my_directory” in a Unix-based system:
mkdir my_directory
This will create a new directory called “my_directory” in the current working directory.
You can also use the mkdir command with options to specify permissions, parent directories, and other properties of the directory you want to create. Here are some commonly used options:
- -p: Create parent directories if they do not exist. For example, mkdir -p /path/to/my_directory will create the directory “/path/to” if it does not exist, and then create “my_directory” inside it.
- -m: Set permissions for the new directory. For example, mkdir -m 755 my_directory will create “my_directory” with permissions set to 755, which gives read, write, and execute permissions to the owner, and read and execute permissions to others.
- -v: Display a message for each directory created. For example, mkdir -v my_directory will display a message saying “mkdir: created directory ‘my_directory'” after successfully creating the directory.
Note that the options and behavior of the mkdir command may vary slightly depending on the operating system you are using. It’s always a good idea to refer to the documentation or man page of the specific operating system you are working with for detailed information on how to use the mkdir command.
mkdir, it’s used to make a new directory in linux. Example, use mkdir my_new_dir to create a new directory named my_new_directory. The -p argument is useful, when you don’t want to make parent directories manually.
TO-M-F13P:~ root# mkdir -p howtouselinux_dir
TO-M-F13P:~ root# ls -lrt howtouselinux_*
-rw-r–r– 1 root staff 14 Nov 7 11:41 howtouselinux_copy
drwxr-xr-x 2 root staff 68 Nov 7 11:44 howtouselinux_dir
head command – print first few lines of a file
The basic syntax for the head command is as follows:
head [options] file_name
where options are optional flags that modify the behavior of the head command, and file_name is the name of the file whose first few lines you want to display.
By default, the head command displays the first 10 lines of a file. For example, to display the first 10 lines of a file called “example.txt”, you would use the following command:
head example.txt
You can also specify a different number of lines to display using the -n option, followed by the number of lines you want to display. For example, to display the first 5 lines of the “example.txt” file, you would use the following command:
head -n 5 example.txt
Other commonly used options with the head command include:
- -c: Display the first N bytes instead of lines. For example, head -c 100 example.txt will display the first 100 bytes of the file.
- -q: Quiet mode, which suppresses headers and footers. This option is useful when used in conjunction with the -v option to display only the lines of a file without any additional information.
- -v: Verbose mode, which displays headers and footers. This option is used in conjunction with the -q option to display headers and footers along with the lines of a file.
Note that the options and behavior of the head command may vary slightly depending on the operating system you are using. It’s always a good idea to refer to the documentation or man page of the specific operating system you are working with for detailed information on how to use the head command.
If you need to print first few lines of a file(any type) then you can use head command. This will print the first 20 lines of the syslogd log to the stdout. By default head command prints first 10 lines.
head -20 /var/log/syslog
tail command – print last few lines of a file
The tail command is a commonly used command in Unix-based systems (such as Linux) and other Unix-like operating systems, including macOS, that is used to display the last few lines of a text file. The basic syntax for the tail command is as follows:
tail [options] file_name
where options are optional flags that modify the behavior of the tail command, and file_name is the name of the file whose last few lines you want to display.
By default, the tail command displays the last 10 lines of a file. For example, to display the last 10 lines of a file called “example.txt”, you would use the following command:
tail example.txt
You can also specify a different number of lines to display using the -n option, followed by the number of lines you want to display. For example, to display the last 5 lines of the “example.txt” file, you would use the following command:
tail -n 5 example.txt
It’s similar to the head command, but the function is opposite, prints last 10 lines of any file by default. Here’s an example, how to print last 30 lines of the kernel log.
tail -30 /var/log/kern.log
Download link for pdf file: Linux commands cheat sheet